Over 30 years ago, I had a desire to make a canoe as I enjoyed paddling around up and down creeks etc.
At various times, the opportunity presented itself, but for various reasons, a canoe never materialised.
4 yrs ago, I thought "Now is the time" so started researching types, methods etc.
After many discussions with a friend (who actually wanted me to make a kayak, but I resisted), it was suggested that I investigate plywood canoes, designed by Michael Storer in Adelaide. Michael's website states "Wooden and Plywood Boat Plans for Amateur Boatbuilders" so I thought "That's what I need" Michael's Eureka canoe really interested me so I sent him an email outlining my lack of knowledge in making a canoe and asking just how suitable it would be as a "first" or should I look at something a bit simpler? I did say I was an Industrial Technology teacher so knew my way around tools etc.
He assured me it would be OK, so I took the plunge and ordered a set of plans. The canoe is constructed by a method known as “stitch and glue” where the panels are “stitched” together with copper wire ties then “glued” using a strip of fibreglass and epoxy along the join. The copper wire twitches are then be removed.
Throughout the following pages, I hope to take you through my journey.
The canoe has been finished for a couple of years now and has seen some outings on the Mary River, and Lake Cootharaba.


Taking the time now to sand the faces, will save time latter because the pieces are shorter and able to be handled easier.

I laid the pieces out just to give me an idea how big the finished canoe would be and yes, there are 2 pieces missing from the photo. (I think they went to check out the water to see what was in store) I did have an idea as 2 sheets of 2440mm x 1220mm plywood joined end for end are large.

The relevant panel pieces are joined to form the sides etc by butting the ends and epoxy bonding another piece of plywood (a strap) over the joint.


This method worked well where the side panels were joined to the base, but where the side panels were joined to the side panels (each end), additional holes needed to be drilled to gradually pull the ply into shape using the wire twitches. This was done as the ply was twitched together to ensure it was a gradual pull into shape.


By now, the sheets of ply are actually starting to look like a canoe and it is time to start tightening all the wire twitches to close up the gaps.


The hull can now be taped. A second coat of epoxy was applied when the first coat became tacky.

As with all projects, the care and attention given to each stage of construction, will determine the quality of the finished product. With that in mind, I looked over the plans, (yes I did believe it or not!) and worked out what material I would need and where I could get it.
I supported the ply on a set of saw horses and armed with the marking out essentials, set about marking the hull shapes.
I supported the ply on a set of saw horses and armed with the marking out essentials, set about marking the hull shapes.


After marking out and cutting the hull panel shapes, I clamped the like pieces together and sanded the edges to ensure they were the same. This is very important to ensure that when the panels are joined later, the canoe will be symmetrical about the centre line


I laid the pieces out just to give me an idea how big the finished canoe would be and yes, there are 2 pieces missing from the photo. (I think they went to check out the water to see what was in store) I did have an idea as 2 sheets of 2440mm x 1220mm plywood joined end for end are large.

The relevant panel pieces are joined to form the sides etc by butting the ends and epoxy bonding another piece of plywood (a strap) over the joint.
These butt straps can be temporarily nailed in place to prevent movement. Because the ply is only 6mm thick, I put a brick on the join to help in making sure the join was flat on the outside of the canoe side.

After the epoxy glue is dry, remove the temporary holding pieces and lightly sand the pieces. When the canoe is completed, the sides with the butt straps will be on the inside, so it is suggested that this side is “painted” with the epoxy finish now.
Each side panel has 3 coats of Boat Cote epoxy finish. When applying each subsequent coat is applied “wet on wet”. Essentially this means that next coat is applied BEFORE the previous coat is completely dry. The advantage of this is so that each coat “bonds” to each other without it having to be lightly sanded thus saving time.
The other panel piece is in another part of the shed because my sawhorses were not wide enough to support all panels.
In order to join the panels, a series of holes needed to be drilled so the wire could be threaded and twitched. These holes needed to be evenly spaced along the edge of the panel so I made a very simple jig to ensure this happened. The jig was made from a scrap of ply (140mm long * 20mm wide) with nails protruding through 100mm apart. A notch was cut in the ply to locate the position for next hole. This meant that each hole was 10mm from the edge and 100mm away from the previous one. (I know if you worked the maths out, the actual distance is 100.4mm but remember the panels are curved) To ensure the panels would join symmetrically, the hole on one panel had to match the hole on the panel it was to be joined to. To ensure this happened, the first hole needed to be at the butt join (the common point in each panel). This was not ideal so the holes were started next to the butt straps and the others measured out using the jig.


This method worked well where the side panels were joined to the base, but where the side panels were joined to the side panels (each end), additional holes needed to be drilled to gradually pull the ply into shape using the wire twitches. This was done as the ply was twitched together to ensure it was a gradual pull into shape.
The panels were loosely twitched initially until the canoe started to take shape then gradually tightened. It was important to start twitching from the middle and work out evenly on both sides. This was time consuming but necessary to ensure the canoe came together symmetrically.


This next part, I guess in one sense, I found the most challenging. It involved “joining” 2 parts of the canoe, the sides to the top. As the ply was being deformed with the twitching, the canoe panels “didn’t want to be deformed”.
I had a couple of goes at this part because it “wasn’t working properly” but I was determined and eventually got it.


By now, the sheets of ply are actually starting to look like a canoe and it is time to start tightening all the wire twitches to close up the gaps.


Now I’m ready to start fibreglass taping the internal seams and this step “locks the canoe into shape”. This is it, the finished shape. Make sure it is not twisted. Because I coated the inside panels with the epoxy, I need to lightly sand the strip where the fibreglass tape will bond.
Because the tape goes over the wire twitches, they need to be “dinted” into the join. This allows them to sit flat against the ply allowing the tape to bond onto the ply. Add another coat of epoxy when the first coat becomes tacky.


Sand the edges of the tape to remove the “bump”.

Turn the canoe over and now trim the wire twitches. I made a lot of work for myself at this step, because I didn’t want to leave the little staples of wire in the canoe. I decided to cut the tape on the inside of the canoe over each twitch and then cut the wire. From the outside, I then removed the wire. By cutting the tape on the inside to remove the wire, meant I then had to go back and fix it but “I had a plan” for later.

After all the wire twitches were removed, the vee shaped grooves along the sheet joins had to filled before applying the fibreglass tape. When cured, sand back to make a smooth join.


Because I cut the tape to remove the wire twitches, I had a lot of holes in the tape to fix. Even though the canoe was still sealed from tape on the outside, I decided to mix up an epoxy paste (the same as the epoxy filler used on the vee grooves” and fillet the joins. This made extra work, but was worth the effort in the end. Because I was going to put a bulkhead in each end, which involved an epoxy paste filler, I decided to do the join fillets at the same time. I masked along the edges of the joins so any excess filler didn’t stick to the finished panels.


The previous picture shows the gunwales clamped onto the outside of the canoe. I pulled down my old pergola from the backyard and decided to reuse the Oregon pine. I needed to trim it down and cut to length. I wanted to try to have the gunwales in one length (ie no joins) but because the Oregon was old and knotty, it kept braking particularly when I put it through the thicknesser. I eventually managed to get 2 pieces the right length (approximately 5M) so I clamped them to the canoe to minimise handling.

With the bulkhead front panel in, it was time to start preparing them for the deck. This involved making and fixing some supports for the ply.
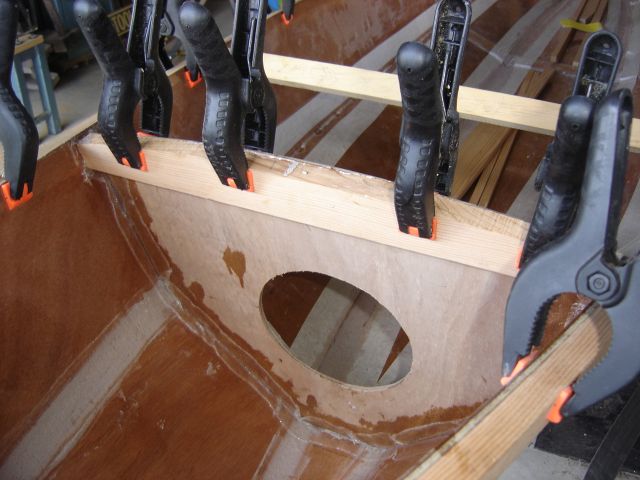


The inwales were made and epoxied into place. The decks were temporarily clamped in place to help this step.


The ply decks were now shaped to fit and epoxy bonded into to place. Because they have a curved top, I had to be a bit inventive as to how I was going to clamp them. By using a series of slats and spacers, it worked.


 After the epoxy was cured, I carefully used a router to machine a groove on the top edge and then filled this with epoxy filler paste. This was not necessary in the structural requirements, but I felt it would give a slightly decorative feature on the decks and not look out of place. I feel it compliments the epoxy filler fillets on the inside of the canoe.
The centre spacer was cut, shaped and fitted into place.

We are really getting somewhere now and after many false starts with seat design ideas, I made two and fitted them in place.


Three coats of epoxy on the outside of the canoe later we are finally in the home stretch.
I am now about to apply a product called Aquacoat. This is a finish similar to paint but it is a hardwearing finish suitable for wooden boats. I have chosen to apply it in a clear finish because I feel “why make a classic wooden canoe and then cover it up in paint?”
I need to sand the whole canoe before applying the finish to make sure the aquacoat adheres properly.

On top of the deck at each end, I fitted a cleat for securing purposes and .................
THE CANOE IS FINISHED

Caitlin said “Lets take the canoe down to the river” I said “no, it’ll get wet!” but she was insistent so down to the river we went.


“No, it’s NOT a rowboat, it’s a CANOE”

So, that's the journey of my canoe. It took a while because "life" got in the way, and I was wasn't doing anything while waiting for things like the epoxy to cure. Knowing what I know now, I could do it a lot quicker because I would be doing the preliminary steps for future tasks while waiting.
I have listed below a couple of things (not in any particular order) that I would do differently next time (if there is a next time!)
- better job at masking the panels where I don't want epoxy until later in the project.
- better method of measuring the two parts of the the epoxy mix. I used a disposable cup with measuring marks on the side. I suggest the pump dispensers available from BoatCraft Pacific (the suppliers of Boat Cote epoxy)
- I wouldn't fibreglass tape the inside joins. I would epoxy fillet between the wire twitches, remove the twitches and the apply the final fillet the correct size. (Still fibreglass the outside joins though)
- While it was a good idea at the time, recycling the oregon pine from my pergola was probably not the wisest move. It was difficult to work with because of its age and exposure to the weather and it kept splintering and cracking.
Overall feeling of the project is that I am very happy with the result. As my first venture into this type of project, I have learn't a lot and pleased I started it and saw it to its completion. I am very impressed with the way it came together and "deformed" the ply to create sleek lines. Due to its lightweight, it sits high in the water and with two people is very easy to paddle.
I hope you enjoyed the journey and it inspires you to step out of your comfort zone and extend your capabilities.
Malcolm
No comments:
Post a Comment